Get a quick start on a ReactJS static, serverless site by cloning my git Repo.
This starter pack uses Webpack and Babel to compile bundled files into a public directory that can be placed on any cheap server or website enabled S3 bucket.
To make it better I’ve got all the settings to use SASS with ReactJS, and a Bootstrap Navbar to have a really nice “Hello World” up in no time.
This is not a ReactJS or webpack tutorial … just look at it as a “cheat-sheet for Webpack and ReactJS site launched using SASS and Bootstrap for compiled CSS creation”
What I’m Sharing:
- a git repo to clone for a basic React site.
- NPM commands necessary to load the Node dependencies
- Package.json and wepback examples are also included in this post itself.
Ok, let’s get started !
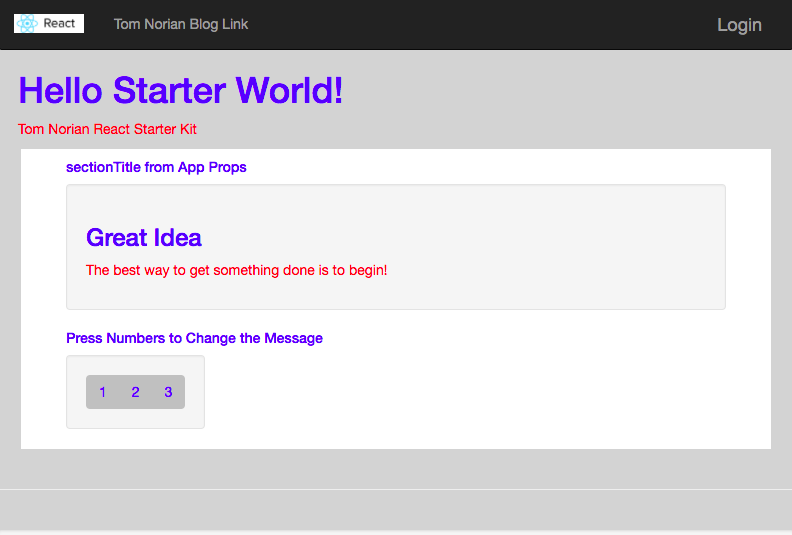
demo: check out the live demo
GitHub repo: ReactStaticSiteStarter GitHub repository.
Download the zip file for the repo above (or clone it at your preference) … then …
npm i webpack@3.4.0 -D
npm i babel-core@6 babel-loader@6 babel-preset-react@6 -D
npm i react@15 react-dom@15 -D
npm i css-loader node-sass sass-loader extract-text-webpack-plugin -D
Check the package.json below to be sure !
LOOK! Only Dev dependencies!?
Yep - all the React code gets compiled into a js file
.. the SASS gets turned into simple CSS. You might want to use a small subsection of Bootstrap or another libary which you can include within the ‘src/css’ folder. The files will get treated correctly depending on whether they have a .scss or .css extension.
Create a basic HTML index file in the PUBLIC folder.
NOTE: I am using CDNs for Bootstrap and JQuery - This index.html is in the Repo already.
<!DOCTYPE html>
<html>
  <head>
    <script
  src="https://code.jquery.com/jquery-3.2.1.min.js"
  integrity="sha256-hwg4gsxgFZhOsEEamdOYGBf13FyQuiTwlAQgxVSNgt4="
  crossorigin="anonymous"></script>
    <link href="https://maxcdn.bootstrapcdn.com/bootstrap/3.3.7/css/bootstrap.min.css" rel="stylesheet" integrity="sha384-BVYiiSIFeK1dGmJRAkycuHAHRg32OmUcww7on3RYdg4Va+PmSTsz/K68vbdEjh4u" crossorigin="anonymous">
    <script src="https://maxcdn.bootstrapcdn.com/bootstrap/3.3.7/js/bootstrap.min.js" integrity="sha384-Tc5IQib027qvyjSMfHjOMaLkfuWVxZxUPnCJA7l2mCWNIpG9mGCD8wGNIcPD7Txa" crossorigin="anonymous"></script>
    <title>Tom's React Starter Kit</title>
    <link rel="stylesheet" href="css/bundle.css">
  </head>
  <body>
    <div id="content"></div>
    <script type="text/javascript" src="js/bundle.js">
    </script>
    <script src="https://maxcdn.bootstrapcdn.com/bootstrap/3.3.7/js/bootstrap.min.js" integrity="sha384-Tc5IQib027qvyjSMfHjOMaLkfuWVxZxUPnCJA7l2mCWNIpG9mGCD8wGNIcPD7Txa" crossorigin="anonymous"></script>

  </body>
</html>
All of the JSX is in the jsx folder inside the src folder. (yes this project also uses the JSX choice of syntax DSL with React)
Again, this is not a tutorial, but syntax can be tricky.
Here is how I configured my Webpack file to compile only the needed code into the public file.
// webpack.config.js


var ExtractTextPlugin = require('extract-text-webpack-plugin');

module.exports = {
  entry: ['./src/jsx/app.jsx',  './src/css/custom.css', './src/css/main.scss',],
  output: {
    path: __dirname + '/public/js/',
    filename: 'bundle.js'
  },
  module: {
    loaders: [
      {
        test: /\.jsx?$/,
        exclude: /(node_modules)/,
        loaders: ['babel-loader']
      },
      {
        test: /\.css$/,
        loader: ExtractTextPlugin.extract(['css-loader']),
      },
      {
        test: /\.(sass|scss)$/,
        loader: ExtractTextPlugin.extract(['css-loader', 'sass-loader'])
      }
    ]
  },
  plugins: [
    new ExtractTextPlugin({
      filename: '../css/bundle.css',
      allChunks: true,
    })
  ]
}
This excellent article: great reference to enable SASS with webpack got me most of the way.
There were some changes you see in my file that differ from his. (things are always changing ! :) )
For good measure here is what your final package.json should look like. If we missed any dependencies go and fetch them with npm i modulename -D
// package.json

{
  "name": "ReactWithSassQuickStart",
  "version": "1.0.0",
  "description": "This is a starter kit to create a static ReactJS website with Sass, Bootstrap with Navbar",
  "main": "index.js",
  "scripts": {
    "build": "./node_modules/.bin/webpack",
    "build-watch": "./node_modules/.bin/webpack -w"
  },
  "author": "",
  "license": "ISC",
  "babel": {
    "presets": [
      "react"
    ]
  },
  "devDependencies": {
    "babel-core": "^6.26.0",
    "babel-loader": "^6.4.1",
    "babel-preset-react": "^6.24.1",
    "css-loader": "^0.28.7",
    "extract-text-webpack-plugin": "^3.0.1",
    "node-sass": "^4.5.3",
    "react": "^15.6.2",
    "react-dom": "^15.6.2",
    "sass-loader": "^6.0.6",
    "style-loader": "^0.19.0",
    "webpack": "^3.4.0"
  }
}
Again, here is the demo: check out the live demo
And here is the GitHub repo: ReactStaticSiteStarter GitHub repository.
Now, Compile and Deploy!
Simply run the script to see that it looks right on your local machine.
(the script is defined within the package.json file shown above)
root[master]>npm run build-watch
I serve it using the the node ‘static’ tool (install that globally: npm i static -g ) by typing
npm i static -g
public[master]> static
Take a look in your web browser at : http://127.0.0.1:8080/#
If it looks good, use your favorite server SCP tool or method to push the entire contents of your Public folder - including the ‘css’, ‘js’ and ‘images’ folders which now have compiled versions of your js and css files within them.
Presto.. you should be in action just like on the live demo page above.
As always, let me know anything I missed with comments and suggestions!