If you’re like me you often learn new technologies by doing while you read the manuals.
In re-exploring the preferred syntax for AngularJS directives, I was coding along with their developer guide . I found that my Chrome browser was throwing cross origin errors when using simple examples like:
XMLHttpRequest cannot load file:///Users/tomnorian/Documents/tutorials/demo-code/templates/sortable-table.html. Cross origin requests are only supported for protocol schemes: http, data, chrome, chrome-extension, https, chrome-extension-resource.
I hadn’t had this problem in the past as I was usually running a NodeJS or Rails server…but when you’re learning code in the sandbox it might just be you and your sleek code editor.
The problem seems to be more isolated to Google Chrome, although at it’s essence they are putting in a good security constraint on the browser. The best work-arounds from the thread were to serve your static development project, or use an IDE that does, rather than relying on simply opening the HTML pages directly as you usually can.
If you have node installed on your development machine all you need to do is:
npm install http-server -g
to use it their directions are:
http-server [path] [options]
More explicitly:
you can simply navigate to the folder of your project you would like to serve and then type ‘http-server’ in your bash terminal to have that directory you are in served as a root.
What you’ll see:
demo-code :> http-server
Starting up http-server, serving ./
Available on:
http://127.0.0.1:8080
http://10.0.0.5:8080
Hit CTRL-C to stop the server
[Wed Mar 01 2017 11:30:13 GMT-0800 (PST)]"GET /index.html""Mozilla/5.0 (Macintosh; Intel Mac OS X 10_10_5) AppleWebKit/537.36 (KHTML, like Gecko) Chrome/56.0.2924.87 Safari/537.36"
Open your browser to http://127.0.0.1:8080 and if you have a index.html file it will be served to you; or type in the filenames (with additional relative paths, if nested) to see them.
That quickly got me around the Chrome CORS issue and onto working AngularJS directive templates; working directly from Sublime Text 2 and Chrome.
This post is mostly to give those guys working on the http-server some well deserved love!
Even though Jekyll is a “static” site generator, with a little ingenuity you can give add many rich features to the generated site.
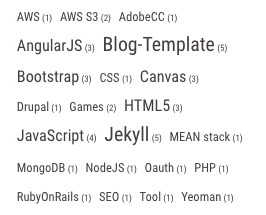
I wanted a tag-cloud! A good tag cloud. You know, one where the tags showed the number of posts next to them as well as growing in size according to the number of posts. One like you see to the left or in the lead image of this post.(yay!)
I also wanted a tagging system that allowed me to combine tags for posts and tags in Jekyll collections: the built-in Jekyll category and tag system doesn’t currently handle tags in collections.
To create an across all posts and an across all collections tag system just requires a name other than ‘tags’. You’ll use that custom-tag name in front matter array just as you would add the standard tags to a post.
Using a custom tag system does lead to some extra looping as you’ll see below. As this tagging system does not use plugins, I believe it could work on a GitHub deployment… no promises there.( I would love to hear if it works at GitHub, though )
Issues and Apologies
Everything I’ve learned and all my gut wants me to use a hash-map, create the view-partial only once, and keep the time complexity, “big O” to a reasonable level.
This solution, forced by the limitations of Jekyll and Liquid in their pursuit of simplicity, loops over every post numerous times. There is the nested loop of looking at every content item for each unique tag after we’ve also loop through all the posts to find unique tags. Clearly a hash tags as keys and values comprised of arrays of associated posts would take a single pass with a second pass to render the tags of various sizes and item counts. If I had used their tag system it could have been a few steps more efficient(but again, that wouldn’t work for collection-tags)
Even worse, (yes it gets worse), the generator recreates the the tag map for each page….we’re almost looking at O cubed.
Why haven’t I found a work around for that? I could use a plugin to find the unique tags and set an environmental variable for that. There are also techniques to generate the tag-cloud once using rake or gulp, or even just generate a static page onto a blank layout normally and cutting and pasting it into an _include. To some degree, the simplicity is part of the Jekyll philosophy. These posts might stimulate thoughts on better work-arounds and I’d love to hear ideas. Generate an _include file Once at StackOverflow and Define and Compute custom Variables at the Jekyll Github Repository.
It would be really nice to be able to us a plugin generate an “_include” or YAML data file.
In the end, this current method will work with the number of posts I anticipate making while maintaing the basic Jekyll work-flow. Because we’re generating a static site none of the redundant calculations will effect client experience, there is no database load(as there isn’t one), and it is certainly more simple for non-developers to use. If the number of posts scaled to the point that the generation was impeding workflow, it would be easy enough to comment out the tag-cloud generation for all but the times you were going to push your new content to a production server.
On to the code:
The comments should explain how it works:
<!-- Create empty arrays to push to -->
{% assign many_tags = '' | split: ',' %}
{% assign unique_tags = '' | split: ',' %}
<!-- get all tags -->
{% for c in site.collections %}
<!-- Map and flatten -->
{% assign collectionTags = c.docs | map: 'subject-tags' | join: ',' | split: ',' %}
<!-- Push to tags -->
{% for tag in collectionTags %}
{% assign many_tags = many_tags | push: tag %}
{% endfor %}
{% endfor %}
<!-- Get Unique subject-tags -->
{% assign unique_tags = many_tags | uniq | sort %}
<divclass="tag-cloud"><!-- go through each tag, find content-items with that tag -->
{% for cloud-tag in unique_tags %}
<!-- initiate an array to hold related content-items -->
{% assign tags_posts = '' | split: ',' %}
<!-- go through every collection (posts is also a collection) -->
{% for c in site.collections %}
<!-- every item in that collection -->
{% for content-item in c.docs %}
<!-- every subject-tag that a content-item has -->
{% for subtag in content-item.subject-tags %}
<!-- check if this content item matches the current tag and if so push-->
{% if subtag == cloud-tag %}
{% assign tags_posts = tags_posts | push: content-item %}
{% endif %}
{% endfor %}
{% endfor %}
{% endfor %}
<!-- check number of content-items (note, trying simple numeric index had some issues with liquid )--><!-- as you make more posts you will want to change the thresholds for size to your taste -->
{% assign tag-quant = tags_posts | size %}
{% if tag-quant < 3%}{%assigntag-cloud-size ="tag-cloud-size-1"%}{%elsiftag-quant<5%}{%assigntag-cloud-size ="tag-cloud-size-2"%}{%elsiftag-quant<8%}{%assigntag-cloud-size ="tag-cloud-size-3"%}{%elsiftag-quant<12%}{%assigntag-cloud-size ="tag-cloud-size-4"%}{%elsiftag-quant<18%}{%assigntag-cloud-size ="tag-cloud-size-5"%}{%else%}{%assigntag-cloud-size ="tag-cloud-size-6"%}{%endif%}<!--NowgenerateHTMLforthegiventag--><!-- The links are to an index page that uses very similar code -->
{% if tag-quant > 0 %} <!-- catch corner case of blank element in array --><ahref="/site-index.html#{{ cloud-tag|slugify }}"><spanclass="tag-cloud-full-tag"><spanclass="tag-cloud-title {{tag-cloud-size}}">{{cloud-tag}}</span><spanclass="tag-cloud-quantity">({{tag-quant}})</span></span></a>
{% endif %}
{% endfor %}<!-- do it again for the next tag - Yes, holy-loop-ville --><!-- NOTE - remove all comments as dozens of them will show up in the generated HTML --></div>
Yes, there are a lot of loops in there, and like I mentioned in the preceding section, we do this for every page with a tag cloud on it. If I were going to have thousands of pages I would create a static page, with or without a plugin, and do the cut and paste hack I mentioned.
There are also a number of contortions to fit Liquid quirks like the technique of initiating the empty arrays to push to and the use of finding the size of an array of objects rather than an incrementing variable.
You’ll note that the tags are links to the tag location on an index page.
In a previous post I described how you can use variables in ‘_includes’. I took advantage of those variables to create a ‘widget’ that allowed something similar to extending liquid with a plugin created tag.
In this post I take the same approach to create a widget that creates a data-toggle element to hide blocks of code or text you might only want available to readers on demand. (demo follows later)
We’re already using Bootstrap through-out the template we may as well use their tool here as well. Behind the scenes Bootstrap uses JQuery so this isn’t a pure HTML solution but it is an easily reusable element you can access directly while creating markdown content.
I’ve gave the ‘widget’ a name of toggle-field.html and placed it within a ‘widgets’ folder inside the _includes folder.
Directions: This is how you use the ‘widget’:
{% capture text-capture %}
```html
<divclass="demo-thats-all-container"><divclass="demo-thats-all-folks">
That's All Folks
</div></div>
\``` <!-- remove escape '\' in your code -->
{% endcapture %}
{% include widgets/toggle-field.html toggle-name="toggle-thats" button-text="Cod for Thats All Folks" toggle-text=text-capture footer="cheers!" %}
where:
button allows for a custom button name (defaults to “Open” if omitted)
toggle-text is the markdown text that is captured between the curly liquid brackets
footer is for an optional label in the toggle block footer.
how ‘capture’ works:
As you can see in the code screen-shot, you’ll need to use Jekyll’s ‘capture’ variable assignment via the liquid capture tags.
I use the shorthand notation of three ‘`’s for code blocks, but that is just standard markdown and any markdown, will work between the capture and endcapture tags.
Copy, paste and substitute content and you’ll have toggle-blocks quickly accessible.
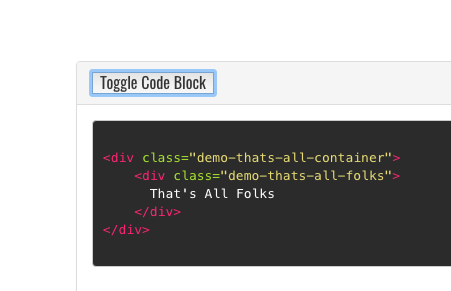
Here is the above code in action:
<divclass="demo-thats-all-container"><divclass="demo-thats-all-folks">
That's All Folks
</div></div>
This second example show’s that this toggle ‘widget’ with any markdown…not just code-blocks.
The rain in Spain falls mainly on the plain.
How much wood could a woodchuck chop if a woodchuck could chop wood?
Behind the scenes, this is the ‘_includes/widgets/toggle-field.html’ ‘widget’ :
<divclass="panel-group"><divclass="panel panel-default"><divclass="panel-heading"><h4class="panel-title"><buttondata-toggle="collapse"data-target="#{{include.toggle-name}}">
{% if include.button-text %} {{include.button-text}} {% else %} Open {% endif %}
</button></h4></div><divid="{{include.toggle-name}}"class="panel-collapse collapse"><divclass="panel-body">{{include.toggle-text | markdownify }}</div><divclass="panel-footer">{{include.footer}}</div></div></div></div>
Note the use of the humorously(to me at least) named liquid filter ‘markdownify’ which translates the captured markdown.
Why? Does this really make writing a blog easier?
While writing a blog using Jekyll doesn’t have a flashy GUI, getting accustomed to markdown isn’t hard.
It is true that more of these ‘widgets’ you use, the more Domain Specific Languages you have to remember. That said, these things like inline photos and toggle text boxes take a bit of a learning curve even within a fancy CMS.
Keep the code snippets easy to copy and paste and fill in the variables: the extra media in your posts really helps.